I finally finished these black ginger jeans on Good Friday. I've lost count of how many times I've made this pattern and every time they feel slightly different. The impact of fabric choice and quality is never more evident than when you make jeans.
I wanted a pair of true black denim jeans and found it really difficult to find fabric. I ended up getting some from Threadbare Fabrics in the US, but it doesn't appear to be on their website anymore. It was described as a stretch denim however the stretch is minimal and there's almost no recovery, but the colour is perfect. My favourite jeans fabric is the Cone Mills S-Gene stretch denim. I haven't found anything else that comes close in terms of recovery and not bagging out.
Looking back through my old posts I haven't really documented my changes to the pattern so I'm including them here for future reference.
These are a size 14, view B. I've narrowed the leg from the knee down by around 1/4 inch and added an extra inch in length. I've also dropped the back crotch curve by 1/4 inch and taken a 1/4 inch from the back yoke at the middle, tapering out to nothing at the side seams. There are further adjustments I could make, but I like these and at the moment I'm not particularly concerned. Nothing in RTW even comes close to fitting me this well or feeling as comfortable. Also, when I look at the first pair I made five years ago I can see I'm carrying more weight but I haven't traced a larger size so that also accounts for some of the drag lines.
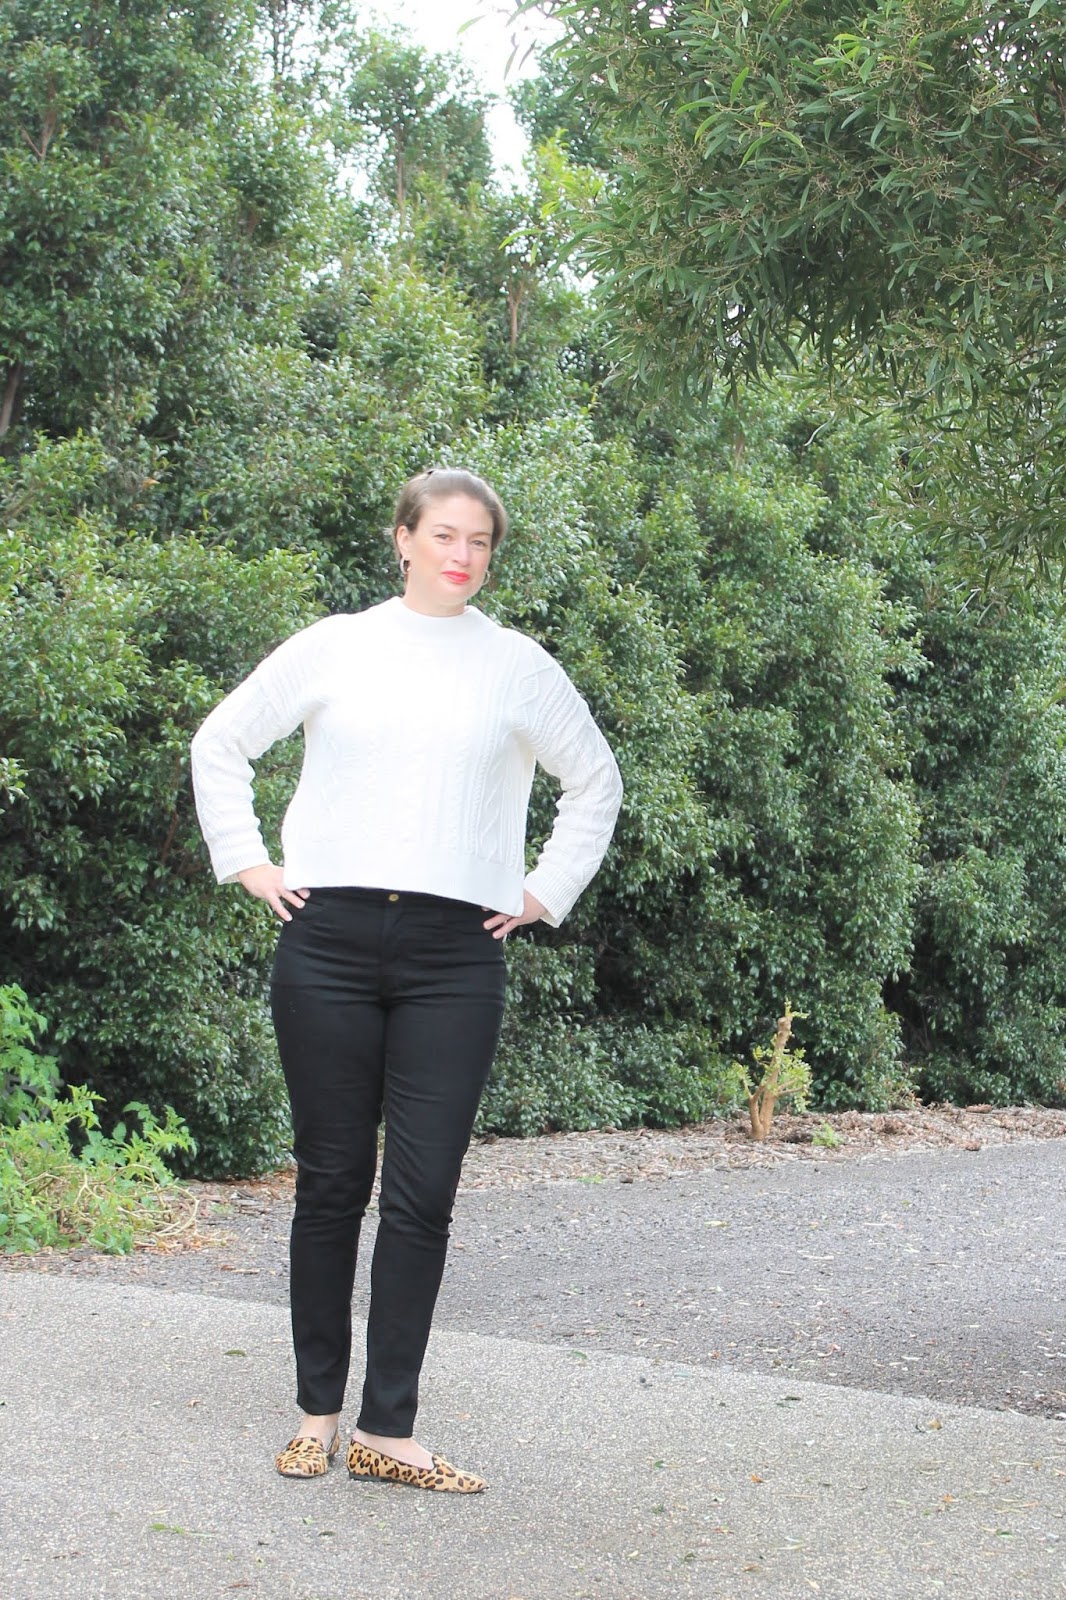
I'm working on my photo set-up, this was my first time using a self-timer and a tripod and they could really use some work. Black is hard enough to photograph let alone adding in a self timer! My family has zero interest in taking photos for me so I need to get this figured out - particularly how I get the camera to focus on me, not the background! So much to learn...
I debated whether I should even post this because I kept focusing on the flaws, but I've never been aiming for perfection, just a friendly space to share my makes, so here we are. Also, it feels good to visually tick something off my April list of sewing plans.
Tuesday, 14 April 2020
Tuesday, 7 April 2020
April Plans
Well what a month March was! I started the month with a night out in the city moving from roof top bar to roof top bar and finished the month in isolation. Along the way I also successfully applied for a new job and handed in my resignation at an organisation that I've worked for for over 15 years. I've felt all the emotions this month!
There was very little sewing in March. My black ginger jeans are 90% done - just need to sew the buttonhole and hems and bang in the button. The wrap top and the bra are not even close, but I still want them and hope to be able to get it done in April.
So for April I'm planning to make:
I finish up at work on Thursday and have two weeks off before I start in my new role so I'm hopeful that I'll be able to achieve everything on my list this month.
These are all really practical items that will work well during this isolation period as well as filling current gaps in my wardrobe.
There was very little sewing in March. My black ginger jeans are 90% done - just need to sew the buttonhole and hems and bang in the button. The wrap top and the bra are not even close, but I still want them and hope to be able to get it done in April.
![]() |
Images via Tessuti Fabrics, Orange Lingerie and David Jones |
So for April I'm planning to make:
- Tessuti Berlin Jacket in black boiled wool from The Cloth Shop Ivanhoe
- Tessuti Many Boat Tee x 2 in green and ivory merino from The Fabric Store
- Orange Lingerie Devonshire Bra
- Trousers/jeans - pattern/s to be determined
I finish up at work on Thursday and have two weeks off before I start in my new role so I'm hopeful that I'll be able to achieve everything on my list this month.
These are all really practical items that will work well during this isolation period as well as filling current gaps in my wardrobe.
Labels:
2020,
Autumn/Winter,
Lingerie,
Orange Lingerie,
pants,
Plans,
Tessuti,
The Cloth Shop,
The Fabric Store,
Top,
wool
Tuesday, 3 March 2020
Making plans - March
Lately I haven't felt productive. At the end of the day I'm so tired I just want to fall on the couch and scroll Instagram - which only makes me feel worse! So I decided to put together some simple plans for March to try and get some balance back.
Here's what I hope to get done:
The best part is that I have all the fabrics and patterns in my stash and I've made a start by cutting out the jeans and the bra.
Pretty modest plans but I'm excited to see them come together.
![]() |
Images via Orange Theory, Tessuti, Peppermint Magazine and Closet Case Patterns |
- Devonshire Bra from Orange Lingerie
- Peppermint wrap top in a gorgeous rhubarb silk satin from Tessuti Fabrics
- Ginger Jeans in true black denim from Threadbare Fabrics
The best part is that I have all the fabrics and patterns in my stash and I've made a start by cutting out the jeans and the bra.
Pretty modest plans but I'm excited to see them come together.
Monday, 24 February 2020
Aeolian tee - the washed out wonder
Let's be clear up front, washed out wonder refers to the pictures, not the pattern!
The Aeolian tee has been incredibly popular for a reason - it's a great pattern that sews up really quickly and looks great.
My measurements placed me as 12-14 which falls in the medium size range. As a first go around I decided to make this up as drafted with no additional length or other changes and I really like the way it fits. I think one of my favourite features is the wide hems, I love the way they look.
For this version I used a viscose jersey from Tessuti Fabrics and I really like the drape it gives the top. The only thing I would change would be to cut the neckband a little shorter, the drape of the fabric provides just a little bit too much give.
It has possibly been corrected by now but I did note that the pattern has incorrect instructions on the neck facing piece. It says to cut one on fold, but there is no fold, you just cut one piece.
I've also seen some great versions of this in a woven fabric and I'd been keen to try that too. So many patterns, so little time!
Monday, 13 January 2020
Style Arc Sunny Knit Top
On new year's eve I cleaned up my sewing room and counted alllll the projects that I had in various stages of completion. I had 30! With another 10 projects waiting to be altered or mended. This top was one of my WIPs, it was just waiting to be hemmed.
This is the Style Arc Sunny Knit top made up in a gorgeous lilac merino from The Fabric Store. Total coincidence that my first two projects of 2020 are both called Sunny! I was drawn to the style lines of this top, quick and easy but with a little bit of interest which is something that I think Style Arc do really well.
Given that I cut this out sometime last year I'm relying on what's in my notepad and on the pattern sheet and it looks like I've made up a straight size 12. No extra length added and the sleeves and body length are perfect for me.
I really like the cocoon shape, I feel like it sits nicely and is easy to wear. While the style lines are different I feel like this has quite a similar feel to the Tessuti Mandy boat tee. Fitted sleeves with volume through the body. Having made both I do prefer the Style Arc Sunny top.
I'm really happy that I finished this one off, I'm pretty sure it's going straight into regular rotation. Now I just need to tackle the rest of the list!
Monday, 6 January 2020
A sunny swimsuit
I have a gorgeous one piece bathing suit from Seafolly. It's beautifully made, fully lined and includes an underwired shelf bra for extra support. It's also a complete pain to pull back up into place once it's wet. I wanted a lovely little bikini to wear in the backyard swimming pool which would make bathroom breaks a breeze. Enter the Sunny Top from Sew Swimmingly and the Watson bikini pattern from Cloth Habit.
Let's start with the top. I bought this bikini top pattern as soon as it was released thinking it would work for my daughters and for me. According to my measurements I'm an XL, the largest size this pattern goes up to (I wear a RTW 12D/34D). Essentially this is a pretty quick and easy sew, but there were some things with the pattern and instructions I disliked and after swimming in the top I'd make changes in the future.
My first issue was with the pattern. It says to cut 1 of the side cups, when it should say cut one pair or cut 2. A pretty basic mistake that I picked up as I was laying out the pattern pieces (this may have been fixed since I bought the pattern).
I found the style of the instructions a bit odd. It was almost like there was a summary statement and then the step by step instructions, which I found confusing rather than helpful.
Some information appears to be missing and at times the instructions don't appear to match the accompanying images. When attaching the elastic around the straps and neckline, the photos show the elastic starting down from the top edge of the straps, but this isn't referenced in the instructions at all. I started the elastic 3/8 inch down from the top edge and this worked well.
I also found the images for this section confusing. The instructions state that you place the lining fabric and outer fabric together and then attach the elastic, but the lining fabric isn't shown in the accompanying photo.
The extra wide neckline is lovely, but those straps aren't comfortable for lots of swimming. I found that they tended to rub the under arms. I would also prefer that the bottom edge was finished with an elastic band rather than a self binding - it didn't feel particularly secure. Once wet, the top rode up at the back and I wonder is that's also because there's no elastic in the bottom to help it stay in place.
If I make this again I would use a self lining, as there was no way I could find to stop it peaking out when you finish the edges as instructed. I would also reshape the neckline to move the straps further towards the center front, curve the top edge of the bust in a little bit more to make the fit more secure, add 1/2 inch extra length and finish the bottom with elastic.
I may tinker with this pattern and make it again if my daughters want it, but I'm not sure I'd make it again for me.
The bikini bottoms couldn't have been more different. I sewed these up in a medium with a couple of simple changes. I added 1/2 inch to the back rise graded out to nothing out the side seams, I removed the front crotch seam and fully lined these. Totally love them. Comfy to swim in and I love the way they look.
Such a long post for such a small pieces of clothing! I love swimwear and I'm hoping to make up a few more patterns before summer is over.
Labels:
bikini,
Cloth Habit,
Pitt Trading,
Sew Swimmingly,
summer,
Sunny bikini top,
Swimwear,
Watson
Wednesday, 1 January 2020
A mighty sports bra to start the new year
Happy New Year! 2019 was quite the year: some amazing highs including a family trip to the USA and some awful lows with my gorgeous sister battling breast cancer and lots of other ups and downs in between.
Through 2019 I started to focus more on my health and fitness and I've set myself some challenging goals for 2020. Which leads me to one of my favourite makes of 2019, the mighty sports bra.
I knew I wanted to make the version with the mesh overlays and I prefer a back closure as it makes it easier to get on and off. My measurements put me in a large, which is what I made. I wear a 12D/34D in RTW bras.
The fabrics all came from Pitt Trading, the closure and fold over elastic from Evie La Luve and the wide band elastic from Tailor Made Shop.
I really enjoyed sewing this up. It came together quickly and the instructions give a nice clean finish on the inside. I self lined the top and found that, combined with the mesh overlay, there was enough support for me to feel comfortable running at a moderate pace on the treadmill. I did manage to sew the closure on backwards so it's not perfect but I've already cut out a second. If/when I make a third I will probably add a half inch extra length.
Monday, 24 June 2019
Cottesloe velvet lounge set
The Megan Nielsen Cottesloe pattern was released as Australia heads into winter so it didn't seem like the right time to be making a pair of bathers but I really wanted to try the pattern.
A quick search of the stash unearthed this stretch velvet from Spotlight. I'd actually call it velour (like the popular track pants back in the day) but Spotlight says it's stretch velvet. Whatever you call it, I just love the colour and the feel of it. I could not get this colour to photograph well, it's a really saturated jewel toned blue. It looks very luxe.
I decided to make view C and cut a size 14 top and size 16 bottoms based on my measurements.
For lounge wear, the fit is fine, but I wouldn't feel secure swimming in these. When I make these again as bathers I would reduce the length of the under bust elastic (in fact, I'd use the top from view D) and I would either size down in the bottoms or tighten the elastic for a more secure fit. But that's the great thing about sewing, you get to customise your projects so the fit is exactly how you like it.
I've got to say this was a really simple project, perfect for a Friday night after a long week at work.
Tuesday, 18 June 2019
Adding the Morgan Jeans to my collection
The latest addition to my jeans collection, and it's not a pair of Ginger Jeans!
I haven't strayed too far though, these are the Closet Case Patterns Morgan Jeans. After wearing skinny jeans for so long seeing the more relaxed fit on my body feels a bit strange, but oh they're so comfy!
I made up size 16, added an extra inch to the length (not that I needed to, I ended up removing it) and used a zip fly instead of the button fly as drafted.
I don't know whether it's because I've made so many pairs of Ginger Jeans, but these came together really quickly. There's a few drag lines so I could probably make a few tweaks to any future versions but they're super wearable so I'm not too worried.
I used a non-stretch denim from Pitt Trading and the top stitching thread left over from a previous jeans project so, with the exception of the zip, these were made entirely from stash items. I love it when that happens!
I'm experimenting with ways to take my own photos so that I don't have to rely on the family. These were taken using the self timer function with the camera balanced on a kitchen stool propped up with a tube of hand cream. Not ideal, but it got the job done. Progress over perfection right?!
Tuesday, 11 June 2019
Simplicity 1059
I'm so excited to share my first post as a contributor for MaaiDesign. I really love the beautifully curated selection of fabrics that Maaike stocks and have purchased from her many times. I was beyond thrilled when Maaike chose me to be a contributor (also - go check out the other posts, they're a talented group of ladies).
Head over to MaaiDesign blog to get the low down on Simplicity 1059 and my thoughts on working with tencel.
Subscribe to:
Posts (Atom)
Social - Nav